Developer Guide
About FoodRem
FoodRem is an Inventory Management System that empowers small food and beverage (F&B) restaurant managers to manage inventory and obtain insights from inventory data. Users can leverage FoodRem’s Inventory Management System to view and edit their inventory during daily operations. FoodRem’s tagging system helps users organize their inventory according to their business needs. FoodRem also derives insights from inventory usage through its statistics.
This Developer Guide provides in-depth documentation on how FoodRem is designed and implemented. It covers the architecture of FoodRem, detailed specifications on smaller pieces of the design, and an outline of all parts of the software and how they will work.
You can use this guide to maintain, upgrade, and evolve FoodRem.
This Developer Guide is accurate as of 7 November 2022.
Head over to How to use the Developer Guide to get started!
Table of Contents
- About FoodRem
- Table of Contents
- Preface
- How to use the Developer Guide
- Design
- Implementation
- Documentation, Configuration, and Other Guides
- Requirements
- Product Scope
- User Stories
- Use Cases
- Use Case 1: Add Item to Inventory
- Use Case 2: Update Item in Inventory
- Use Case 3: Delete Item from Inventory
- Use Case 4: Create Tag
- Use Case 5: Find Item
- Use Case 6: Add Tag to Item
- Use Case 7: Rename a tag
- Use Case 8: Removing a tag from an item
- Use Case 9: Increment/Decrement Quantity of Item
- Use Case 10: Sorting List of Items by Criteria
- Non-Functional Requirements
- Instructions for Manual Testing
- Effort
- Glossary
Preface
Acknowledgements
FoodRem is a brownfield software project based off AddressBook Level-3, taken under the CS2103T Software Engineering module held by the School of Computing at the National University of Singapore.
Java dependencies:
Documentation dependencies:
Fonts used in FoodRem:
- FoodRem Java App:
- Epilogue by Tyler Finck
- JetBrains Mono by Philipp Nurullin and Konstantin Bulenkov
- Montserrat by Julieta Ulanovsky et al.
- FoodRem Website:
- Epilogue by Tyler Finck
- Source Code Pro by Paul D. Hunt
Other acknowledgments:
- Material Design Icons:
- food-turkey by Colton Wiscombe as FoodRem’s App Icon
- Font Awesome 6 icons:
- book as the “note” admonition icon
- circle-info as the “info” admonition icon
- fire-flame-curved as the “danger” admonition icon
- lightbulb as the “tip” admonition icon
- triangle-exclamation as the “warning” admonition icon
- Octicons:
- git-merge for the PR badge used in the project PPPs
- issue-closed for the issue badge used in the project PPPs
- Code acknowledgements:
- Custom link fragment checker adapted from the World Wide Web Consortium
- Pure CSS auto-incrementing heading counters adapted from @gvgramazio on StackOverflow
- PDF styling of HTML pages following Michael Perrin’s tutorial
- Pure liquid admonitions adapted from @kimkyunghwan21 on GitHub
- Pure liquid HTML table-of-contents from @allejo on GitHub
- Miscellaneous:
- Docusaurus for admonition colors and styling
- GitHub for “PR merged” and “issue closed” colors used in PPP badges
- SchemeColor for admonition colors
Setting Up, Getting Started
Refer to the guide Setting up and getting started.
How to use the Developer Guide
Thank you for your interest in how FoodRem works! We are delighted you are reading this guide, and we aim to provide you with all the necessary information to understand, maintain, upgrade, and evolve FoodRem.
TIP
You do not need to read the Developer Guide in a sequential order. However, we recommend going through the section on Design to get a high-level overview of this application before searching for information that concerns you. Most portions of the developer guide can be understood if you have a good overview of FoodRem’s design.
The Developer Guide has six main components:
- Design
- Implementation
- Documentation, Configuration and Other Guides
- Requirements
- Instructions for manual testing
- Effort
As a developer, the first three sections would be most applicable to you. The section on Design gives you a high-level overview of how the application is structured and what the key components of FoodRem are. After reading the section on design, the section on Implementation covers how
items
Represents a thing that is stored and kept track by FoodRem.
Click to view glossary
,
tags
The main method of categorizing items in FoodRem. A tag may be attached to zero or more items.
Click to view glossary
, statistics and general features are implemented. Lastly, the section on Documentation, Configuration and Other Guides
If you are in the marketing or product team or want to know why FoodRem was created, the section on Requirements covers the Product Scope, User Stories, Use Cases, and Non-Functional Requirements.
If you are a tester, the section on Instructions for manual testing would be most applicable to you. It covers how to launch and shut down the application and how to test some commands in FoodRem.
Last but not least, Effort shares the difficulties in implementing FoodRem and the challenges faced.
You can also refer to the Glossary for definitions of commonly used terms in FoodRem.
Admonition Boxes
Throughout this guide, you may find coloured boxes containing highlighted pieces of text. These are known as admonition boxes, or simply,
admonitions
Admonition boxes (or simply “admonitions”) are coloured boxes containing highlighted pieces of text.
Click to view glossary
. Please take note of the content within.
| Icon | Meaning |
|---|---|
 |
Something you should keep in mind. |
 |
Something you might find useful. |
 |
Something that provides information useful in that context. |
 |
Something you should be cautious about. |
 |
Something you should pay a lot of attention to. |
Other Notation
Besides icons, there are also some special notations that are used in this guide:
- Links in blue point to other sections in this document, or places on the internet.
- Words with a dotted underlineA summary of the glossary entry will appear here. represent terms, which when clicked, take you to the corresponding entry in the glossary section at the end of this guide.
Design
This section gives you a high-level overview of how the application is structured and what the key components of FoodRem are.
The Architecture section gives an overview of how the main components in FoodRem interact with one another.
FoodRem has four main components, and each section describe smaller subcomponents within them. The main components are namely:
The section on Common Classes covers useful classes used by multiple components.
NOTE
The .puml files used to create diagrams in this document can be found in the diagrams folder. Refer to the PlantUML Tutorial at se-edu/guides to learn how to create and edit diagrams.
Architecture

The Architecture Diagram given above explains the high-level design of the App.
Given below is a quick overview of the main components and how they interact with each other.
Main components of the architecture
Main has two classes called Main and MainApp. It is responsible for:
- Initializing the components in the correct sequence during the app launch
- Connecting the components with each other during the app launch
- Shutting down the components during shut down
- Invoking cleanup methods where necessary during shut down
The rest of the App consists of four components.
- UI: Handles the User Interface of the App
- Logic: Handles the execution of commands
- Model: Holds the data of the App in memory
- Storage: Reads data from and writes data to the hard disk
Commons contain a collection of classes used by multiple other components.
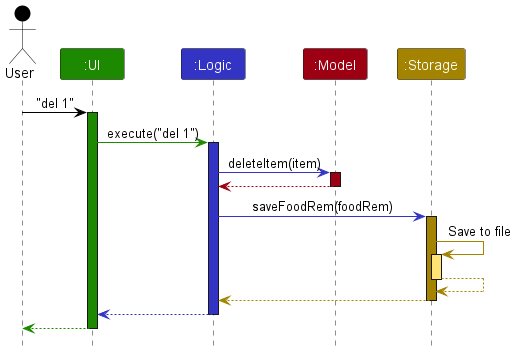
How the architecture components interact with each other
The Sequence Diagram below shows how the components interact with each other in the scenario where the user issues the command del 1. This deletes the first item from the
Item List Box
The region located at the bottom-left of FoodRem’s main window.
Click to view glossary
.
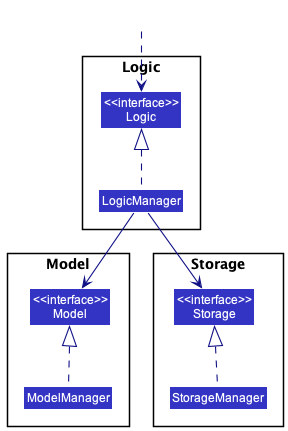
Each of the four main components (also shown in the diagram above),
- defines its API in an
interfacewith the same name as the Component. - implements its functionality using a concrete
{Component Name} Managerclass (which follows the corresponding APIinterfacementioned in the previous point).
For example, the Logic component defines its API in the Logic.java interface and implements its functionality using the LogicManager.java class which follows the Logic interface. Other components interact with a given component through its interface rather than the concrete class (Reason: to prevent outside components from being coupled to the implementation of a component), as illustrated in the (partial) class diagram below.
UI Component
The UI component handles the user-interface portion of the application.
API : Ui.java
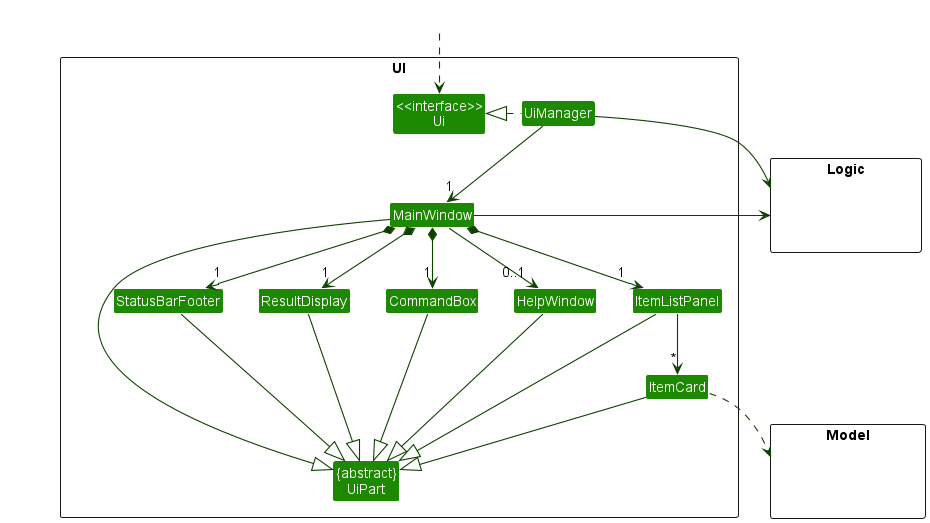
The UI consists of a MainWindow that is made up of parts, e.g.CommandBox, ResultDisplay, ItemListPanel, StatusBarFooter etc. All these, including the MainWindow, inherit from the abstract UiPart class which captures the commonalities between classes that represent parts of the visible
GUI
A Graphical User Interface is a graphics-based interface that uses icons, menus and a mouse (to click on the icon or pull down the menus) to manage interaction with the system. In FoodRem, this presents as the window that appears when launching it.
Click to view glossary
.
The UI component uses the JavaFX UI framework. The layout of these UI parts is defined in matching .fxml files that are in the src/main/resources/view folder. For example, the layout of the MainWindow is specified in MainWindow.fxml
The UI component,
- executes user
commands
A feature or function that FoodRem can perform.
Click to view glossary using theLogiccomponent. - listens for changes to
Modeldata so that the UI can be updated with the modified data. - keeps a reference to the
Logiccomponent because theUIrelies on it to execute commands. - depends on some classes in the
Modelcomponent, as it displaysItemobjects residing in theModel.
Logic Component
The Logic Component handles the execution of
commands
A feature or function that FoodRem can perform.
Click to view glossary
.
API : Logic.java
Here’s a (partial) class diagram of the Logic component:
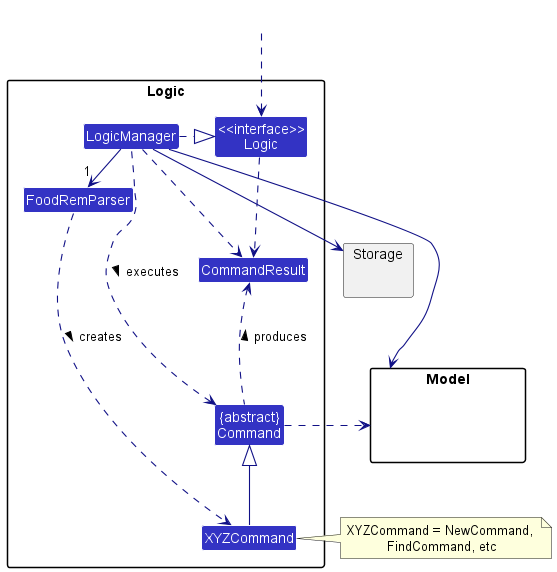
How the Logic component works:
- When
Logicis called upon to execute a command, it uses theFoodRemParserclass to parse the user command. - This results in a
Commandobject (more precisely, an object of one of its subclasses, e.g.,NewCommand) which is executed by theLogicManager. - The command can communicate with the
Modelwhen it is executed (e.g. to add an item). - The result of the command execution is encapsulated in a
CommandResultobject, which is returned fromLogic.
The Sequence Diagram below illustrates the interactions within the Logic component for the execute("del 1") API call.
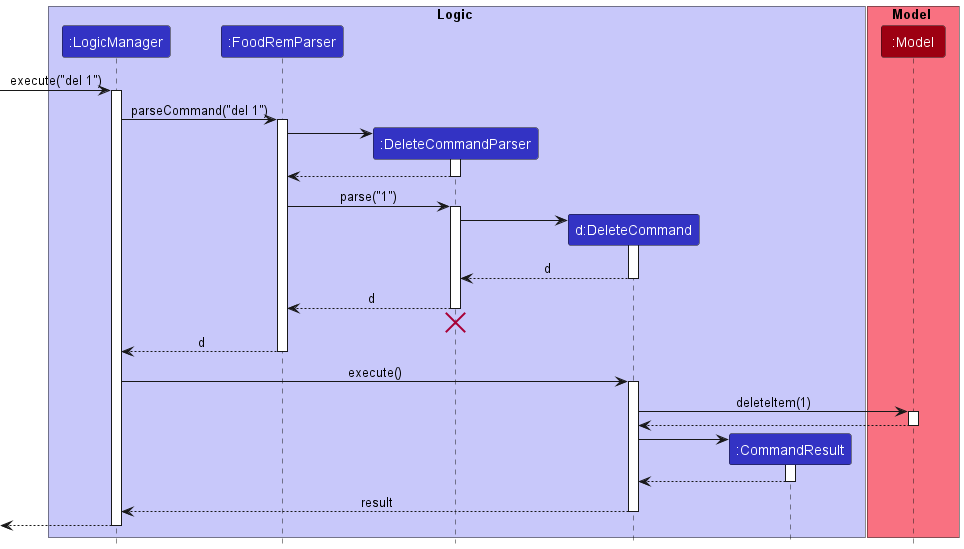
NOTE
The lifeline for DeleteCommandParser should end at the destroy marker (X) but due to a limitation of PlantUML, the lifeline reaches the end of the diagram.
Here are the other classes in Logic (omitted from the class diagram above) that are used for parsing a user command:
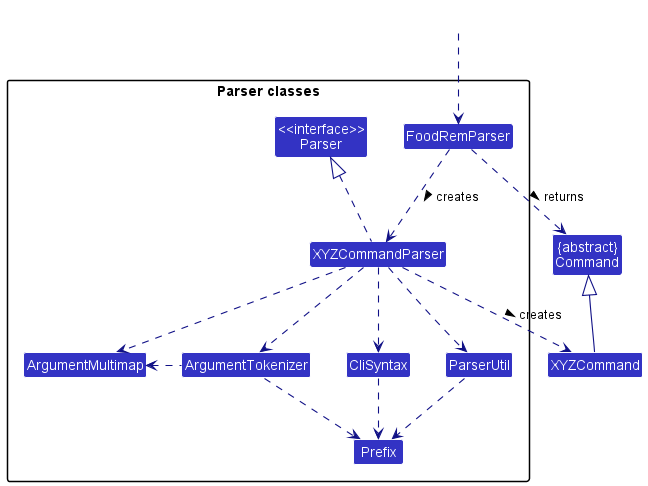
How the parsing works:
- When called upon to parse a user command, the
FoodRemParserclass creates anXYZCommandParser(XYZis a placeholder Placeholders in FoodRem refers to the UPPER_CASE words that appear after flags in commands that can be replaced by user input supplied. For example in n/ITEM_NAME, ITEM_NAME is a placeholder.
Click to view glossary for the specific command name e.g.,NewCommandParser) which uses the other classes shown above to parse the user command and create aXYZCommandobject (e.g.,NewCommand) which theFoodRemParserreturns back as aCommandobject. - All
XYZCommandParserclasses (e.g.,NewCommandParser,DeleteCommandParser, …) inherit from theParserinterface so that they can be treated similarly where possible e.g, during testing.
Model Component
The Model component holds the data of the app in memory.
API : Model.java
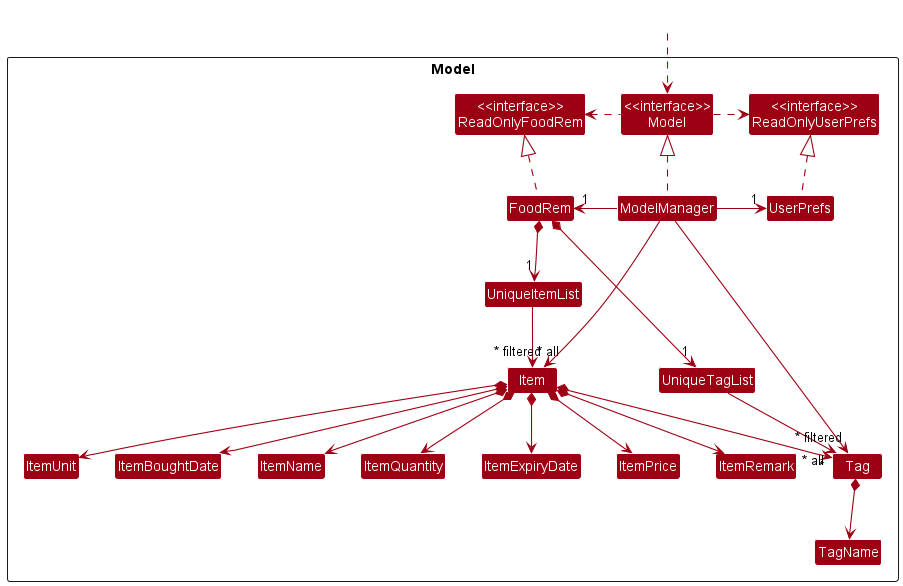
The Model component,
- stores FoodRem data i.e., all
ItemandTagobjects (which are contained in the respectiveUniqueItemListandUniqueTagListobjects). - stores the currently ‘selected’
ItemandTagobjects (e.g., results of a search query) as a separate filtered list that is exposed to outsiders as an unmodifiableObservableList<Item>andObservableList<Tag>that can be ‘observed’ e.g. the UI can be bound to this list so that the UI automatically updates when the data in the list change. - stores a
UserPrefobject that represents the user’s preferences. This is exposed to the outside as aReadOnlyUserPrefobjects. - does not depend on any of the other three components (as the
Modelrepresents data entities of the domain, they should make sense on their own without depending on other components)
Storage Component
The Storage Component reads data from, and writes data to, the hard disk.
API : Storage.java
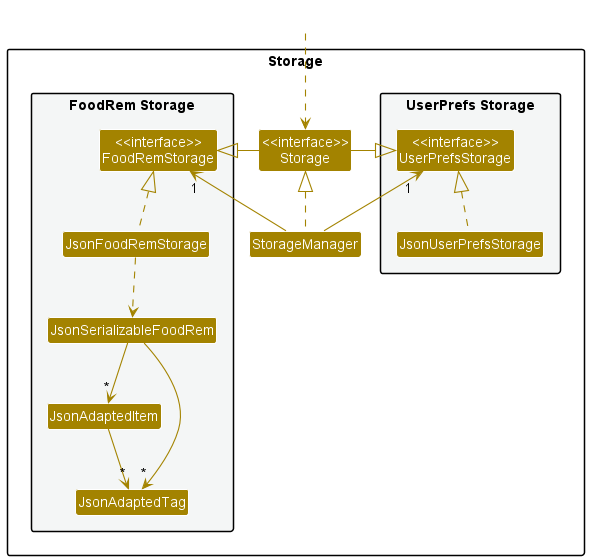
The Storage component,
- can save both FoodRem data and user preference data in json format, and read them back into corresponding objects.
- inherits from both
FoodRemStorageandUserPrefStorage, which means it can be treated as either one (if only the functionality of only one is needed). - depends on some classes in the
Modelcomponent (because theStoragecomponent’s job is to save/retrieve objects that belong to theModel)
Common Classes
Classes used by multiple components are in the seedu.foodrem.commons package.
API : Commons
Implementation
This section shares with you some noteworthy details on how certain features are implemented.
There are four main groups of features that are implemented:
Item-related Features
General Implementation Details

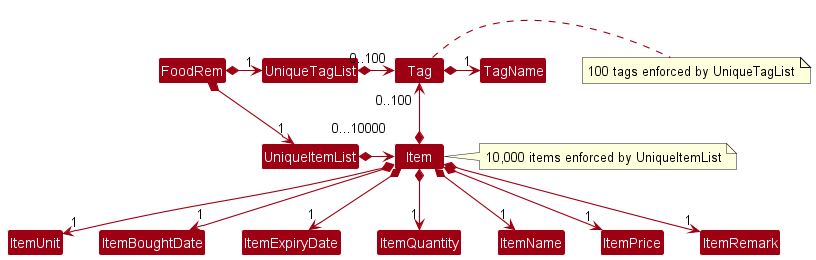
The Item object is composed of classes representing the attribute available in them. Items are stored in a UniqueItemList while tags are stored in a UniqueTagList. These lists restrict the maximum number of items and tags in FoodRem.
The related attributes of an item are:
ItemName: The name of the Item.ItemQuantity: The number of units of an Item.ItemUnit: The unit of measurement of an Item.ItemBoughtDate: The date when the Item was bought.ItemExpiryDate: The date when the Item expires.ItemPrice: The cost of one unit of the Item.ItemRemark: Any attached remarks to the Item.
Regarding the attributes, here are a few things to note:
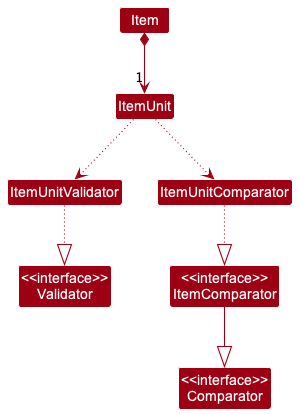
- The Item value is the
ItemPricemultiplied by theItemQuantity. This is used for the Statistics feature. - Each attribute in
Itemis dependent on a respectiveValidatorandItemComparator.Validatoris an interface that facilitates validation of fields whenItemis created.ItemComparatorisComparatorthat facilitates sorting of items by its respective attributes.
General Design Considerations
The design of Items models very closely to the implementation of a Person class in the original AddressBook3 (AB3) codebase, of which FoodRem adapted from. However, there are a few modifications made:
- The
Personclass was modified to fit the business logic of FoodRem. For example, renaming it toItem, and including different attributes, as mentioned above. - Addition of new helper and getter methods
- Addition of Tags, where Items stores its own sets of associated
Tagobjects in an internalSet<Tag>.
It should be noted that the UniqueItemList referenced in ModelManager is immutable. To interact with Items, ObservableList instances and its child classes, FilteredList and SortedList, are used in the Commands. For example, filtering an item by its tag name would modify the filteredItems list (which is a FilteredList).
Creating an Item
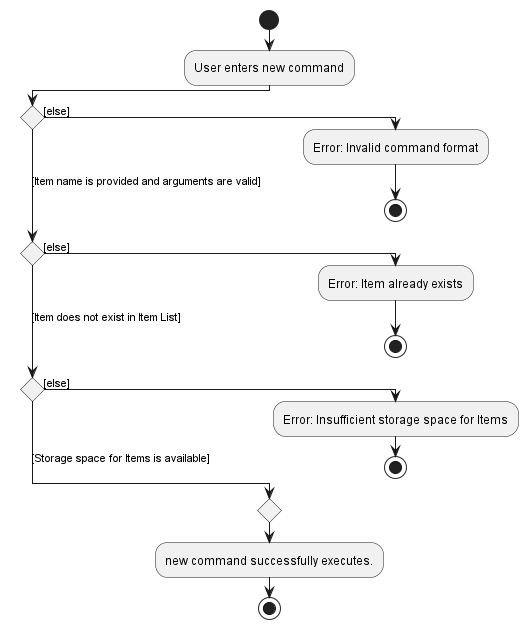
Overview
The new command creates a new Item in FoodRem, which forms the core business logic of being able to represent an inventory item.
The activity diagram is as such:
The sequence diagram to show the interactions between the different components during a new command is as such:
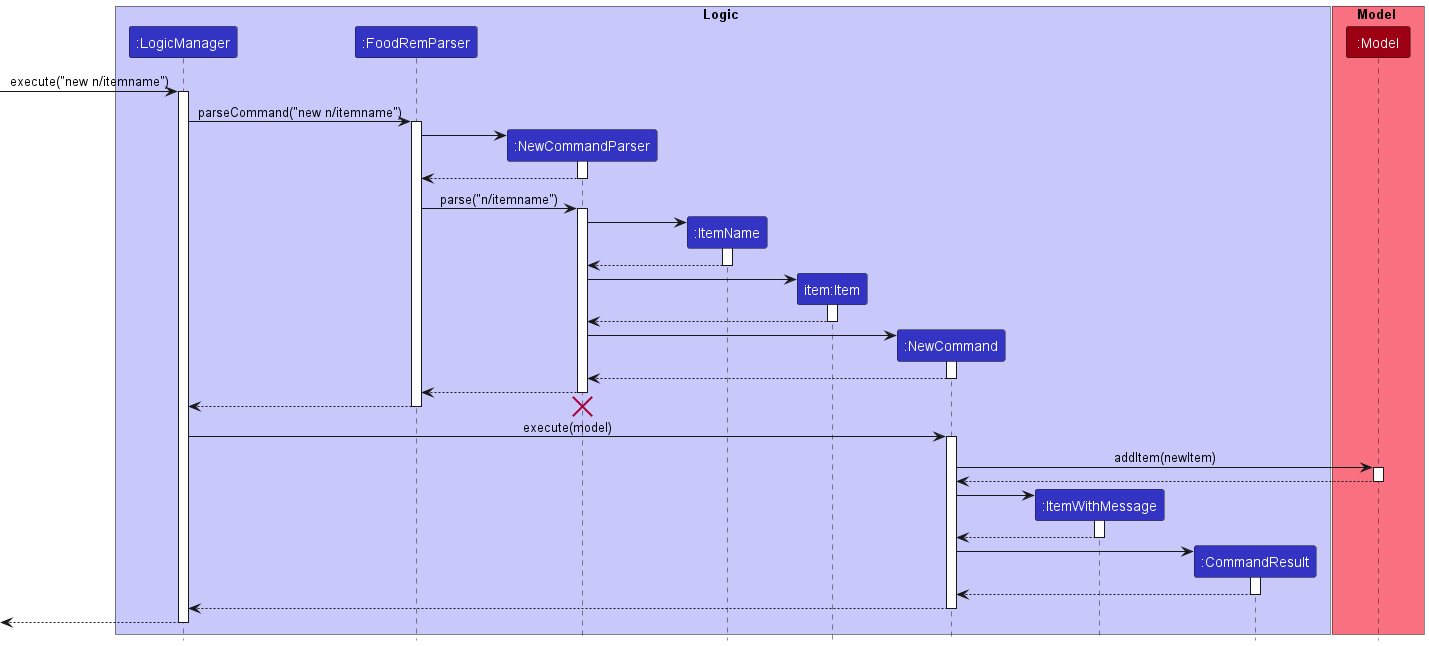
This diagram excludes the instantiation of the objects that represents attributes in an Item, e.g. ItemQuantity, ItemUnit. This is because including all of them would cause the UML diagram to be cluttered and too small to read.
Feature Details
- The user specifies an item name for the Item to create. Optionally, the user can specify the item quantity, bought date, expiry date, price, and any remarks.
- If the item name is not provided, or if an invalid command arguments are provided, the user will be prompted to enter the command correctly via an error message.
- The item is cross-referenced in the
Modelto check if it already exists. If it already does, then an error is raised to inform the user. - If the item storage of FoodRem is full, an error is thrown to inform the user that the maximum item limit is reached, and that no new items can be added.
- If step 4 completes without any exceptions, then the new
Itemis successfully created and stored inside the Item.
Feature Considerations
It should be noted that when checking for duplicates in the UniqueItemList inside the Model, Items cannot have the same name. This is because allowing Items with the same name will introduce additional complexity for other commands, and also presents confusingly to the user. This is room for improvement, as items ideally can have the same name. For example, the user should ideally have multiple Potato items with different bought and expiry dates.
When providing multiple arguments with the same delimiter, the last instance of the repeat delimiter is taken during the parse command.
Editing an Item
Overview
The edit feature edits the attached attributes of a specified Item, which is specified by the one-indexed itemList presented to the user.
The activity diagram is as such:
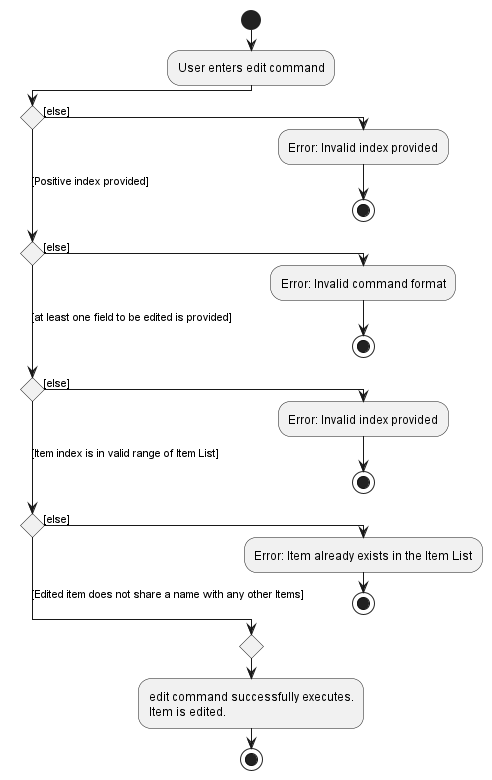
Here is the activity diagram showing the process of the edit command:
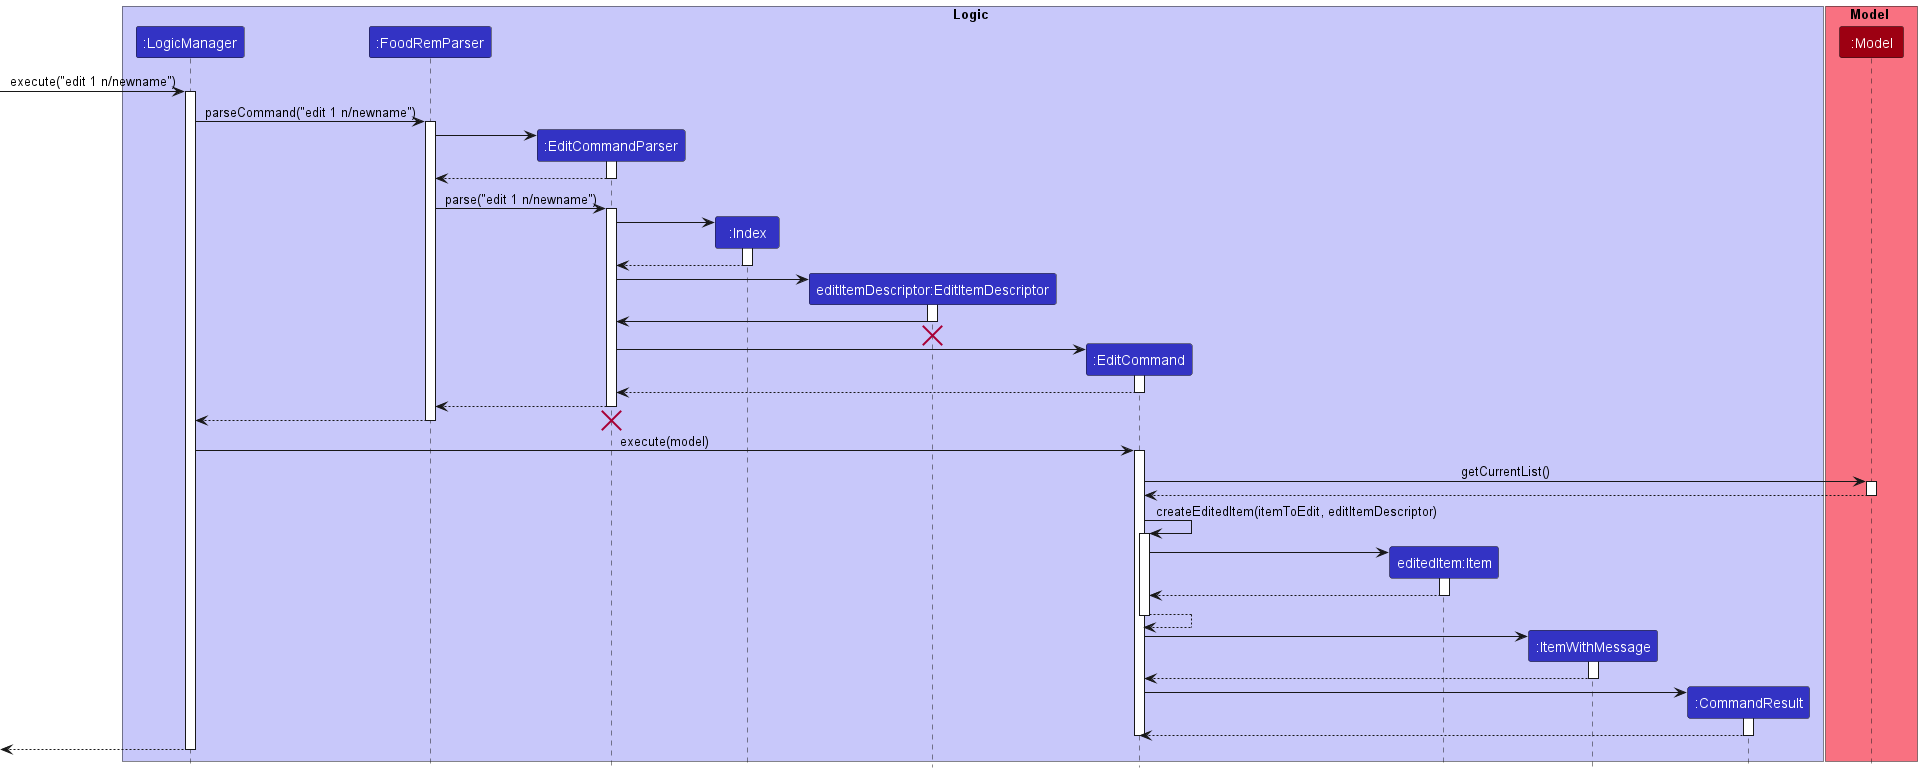
This diagram excludes the instantiation of the objects that represents attributes in an Item, e.g. ItemQuantity, ItemUnit, when the EditCommand object creates an editedItem. This is because including all of them would cause the UML diagram to be cluttered and too small to read.
Feature Details
- The user specifies an item index that represents an
Itemto be edited. - If a negative or zero index is provided, an error is thrown and the user is prompted to enter the command correctly via an error message.
- At least one field to be edited has to be provided. Else, the user will be prompted to enter the command correctly via an error message.
- The item is cross-referenced in the
Modelto check if it already exists. If it already does, then an error is raised to inform the user. - Finally, if an index that is not in the valid range of the Item List is provided, an error is thrown and the user is prompted to enter the command correctly via an error message.
- If step 4 completes without any exceptions, then the new
Itemis successfully edited.
Feature Considerations
Similar to the new command, it should be noted that when checking for duplicates in the UniqueItemList inside the Model, Items cannot have the same name. For example, if an Item with the name Potato already exists inside the inventory, then you cannot edit an existing Item to have the name Potato.
When providing multiple arguments with the same delimiter, the last instance of the repeat delimiter is taken during the parse command.
Incrementing and Decrementing the quantity of an Item
Overview
The inc and dec feature increments or decrements the quantity of an item.
Feature Details
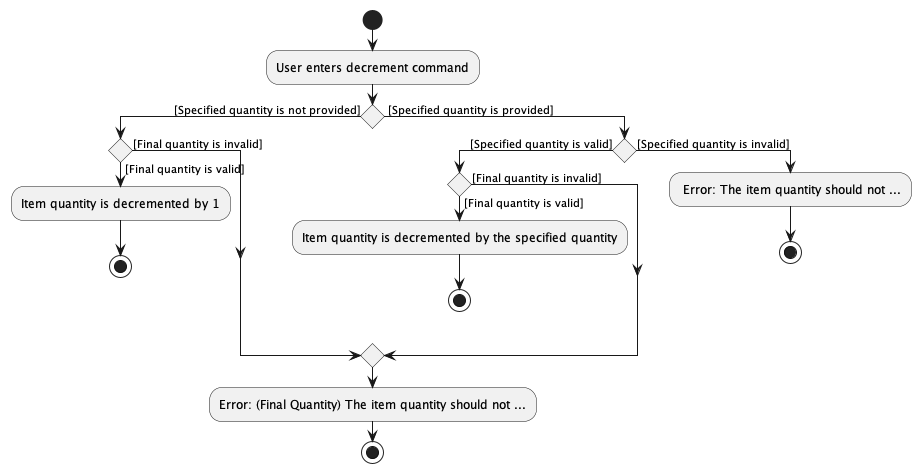
- The user can specify to increment or decrement the quantity of an item by a specific quantity.
- The user can also specify to increment or decrement without a provided quantity.
Feature Considerations
When implementing this feature, we realised that it is common to increment or decrement just by one unit. We thus decided to provide a default behaviour when incrementing or decrementing an item quantity.
Another command that have such default behaviour is the rmk (remark) feature, where users will delete a current remark if one is not provided.
Sorting an Item
Overview
The sort feature sorts the list of items currently displayed to the user by a specified
flag
A marker or delimiter signifying a potentially optional argument to a command. For example on FoodRem, in the syntax n/ITEM_NAME , n/ is the flag.
Click to view glossary
. A list of available criteria for sorting includes:
- Name
- Quantity
- Unit
- Bought Date
- Expiry Date
- Price
- Remarks
Currently, sorting is performed in ascending order. A future implementation will allow sorting either ascendingly or descendingly.
Feature Details
- The user can perform other commands that modify the presented item list, such as the
findcommand. - The user specifies one or more criteria used for sorting. The available criteria for sorting are listed above.
- If the displayed item list is empty, then an empty list is displayed.
- If the item list is not empty, the items are sorted according to the specified criteria. Sorting is performed in order of the criteria specified.
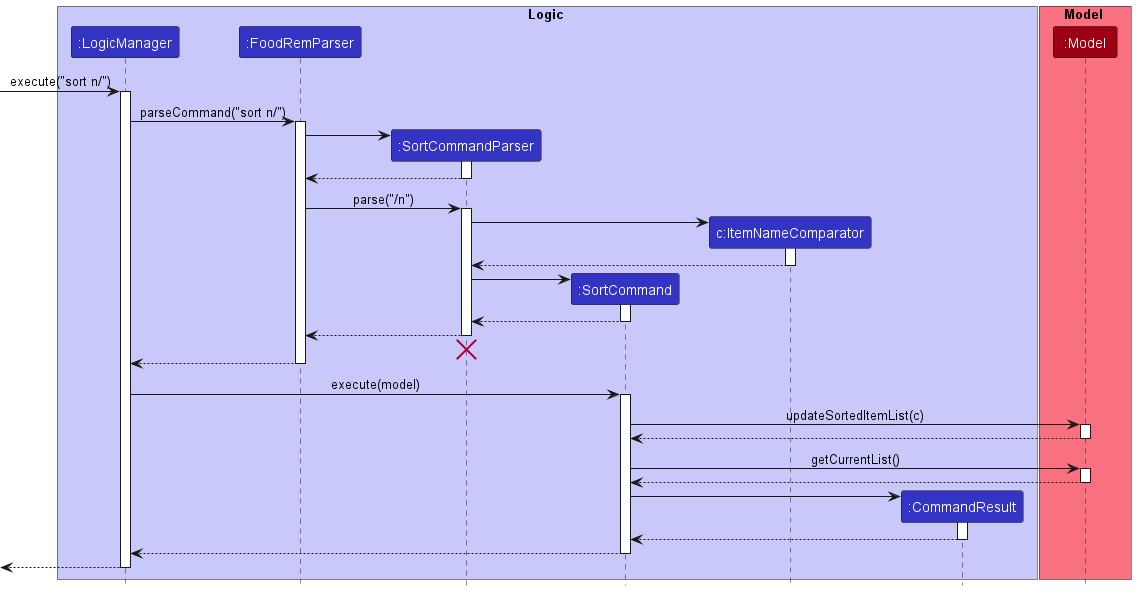
Feature Considerations
There is a SortedList obtained from an immutable item list. When the SortCommand is executed to sort the list of items, depending on the input, the appropriate comparator is chosen and applied. The UI tracks changes to the SortedList and displays the updated sorted item list.
It should be noted that if multiple comparators are provided as arguments, only the last argument is considered when selecting comparators.
Tag-related Features
General Implementation Details
The tagging functionality is facilitated by the UniqueTagList stored in FoodRem. Additionally, each Item stores its own sets of associated Tag objects in an internal Set<Tag>.
- Creating, updating and deleting
tags
The main method of categorizing items in FoodRem. A tag may be attached to zero or more items.
Click to view glossary will modify the tags within theUniqueTagListwhich contains all existingTagobjects. - Tagging/untagging a
Tagto anItemwill add/remove the correspondingTagobject to theSet<Tag>stored withinItem.
Given below is an UML diagram of Tag and the classes related to it:
General Design Considerations
When storing a tag, these are the alternatives considered.
-
Alternative 1 (current choice): Store
Tagin a separateUniqueTagListand eachItemstores its own set of associatedTag- Pros:
- Easy to implement
- Allows users to create and rename
Tagto suit their own use case instead of just providing a preset list ofTagthat cannot be modified or extended
- Cons:
- Unable to define association/relationship between different
Tag - Additional storage used as compared to below alternatives
- Unable to define association/relationship between different
- Pros:
-
Alternative 2: Design a tree-like structure similar to a full type system where users can extend from to create new
Tag- Pros:
- Able to define association/relationship between different
Tag(e.gApplecan be nested underFruitsso tagging anItemwithApplemarks it as aFruitsas well) - Saves space
- Only a single tree is needed, no need to store associated
TagwithinItem, the classification ofItemandTagis represented by the relationship represented by this tree
- Only a single tree is needed, no need to store associated
- Easily extensible (defining a new
TagorItemcan be as simple as creating a new node in the tree)
- Able to define association/relationship between different
- Cons:
- Example of over-engineering, unnecessarily complicates things when compared to alternative 1
- Unlikely to have deeply nested relationships for
Tag, adding eachTagto anItemis much simpler - Unlikely to need so many
Tag, in which case alternative one would result in faster operations by using hash tables instead of a tree
- Pros:
-
Alternative 3: Use classes and inheritance to represent different classification to achieve similar tagging effect
- Pros:
- Less storage used as compared to storing associated
TagwithinSetin eachItemas well as allTaginUniqueTagList - Possibly more convenient when creating
Itemsince users do not have to manually add associatedTagafter creating theItem
- Less storage used as compared to storing associated
- Cons:
- Users are unable to extend and edit classes similar to how they can edit
Tag - Not scalable and poor developer experience in creating and maintaining a separate class for every new classification/tag users want to have
- Java supports only single class inheritance. Limited support for associating
Itemto multipleTag
- Users are unable to extend and edit classes similar to how they can edit
- Pros:
Creating a Tag
Overview
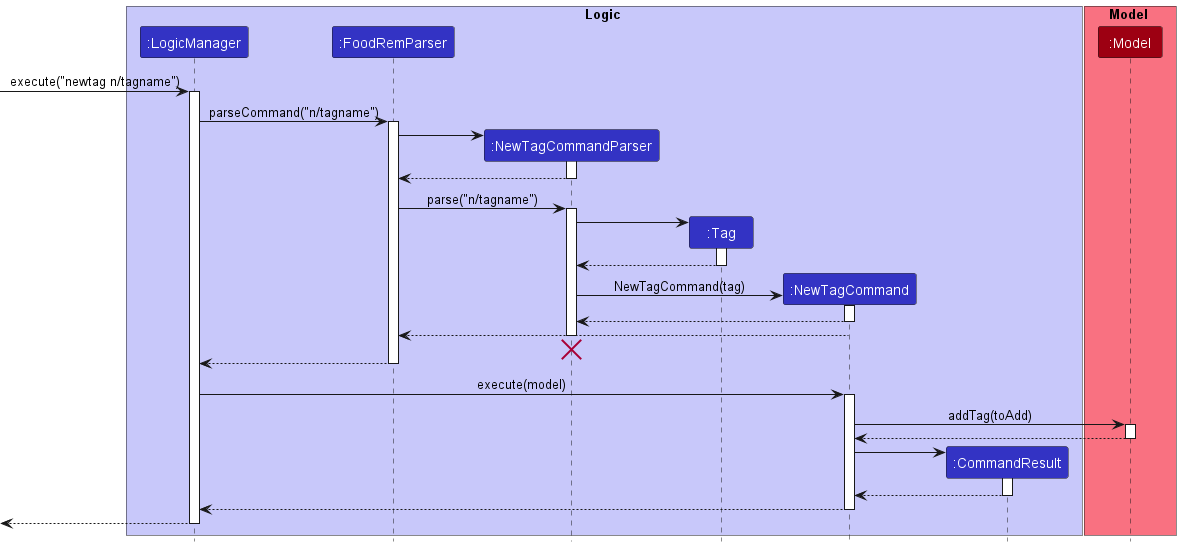
The newtag command creates a new tag in FoodRem which can be subsequently used in another command (tag) to tag items for classification.
Here is the sequence diagram showing the interactions between the different components during a newtag command.
Feature Details
- The user specifies a tag name for the new tag when creating the new tag
- If the tag name of the new tag is not provided, the user will be prompted to enter the command correctly via an error message.
- If the new tag ( tag with the same tag name) already exists in
model, an error is thrown to inform the user that the tag already exists. - If the tag storage of FoodRem is full, an error will be thrown to inform the user that the maximum limit of tags has been reached and no additional tags can be created and stored on FoodRem.
- If the new tag name has an invalid format, an error is thrown to inform the user of the invalid tag name format.
- If Step 5 completes without any exceptions, a new tag is successfully created and stored inside the tag storage.
Feature Considerations
Tag is implemented as a separate class (rather than having it as a set of String in Item). With this, we could have a newtag command so that when we can create a Tag object independently. This specific Tag object can be referenced by different Item objects. We will also hence be able to check whether Tag objects of the same name has been created before and if so, prevent these duplicate Tag objects from being created. Thus, if different Item objects wants to reference Tag of the same name, they will all reference to the same Tag object. Moreover, this gives us more flexibility in creating other commands such as deletetag or renametag which we can apply to a specific tag and updates made to this tag will be reflected across all Item objects that reference this Tag object.
Tagging an Item
Overview
The tag item command tags an item with the provided tag name in FoodRem. If both the item and the tag are valid, the item will be tagged successfully.
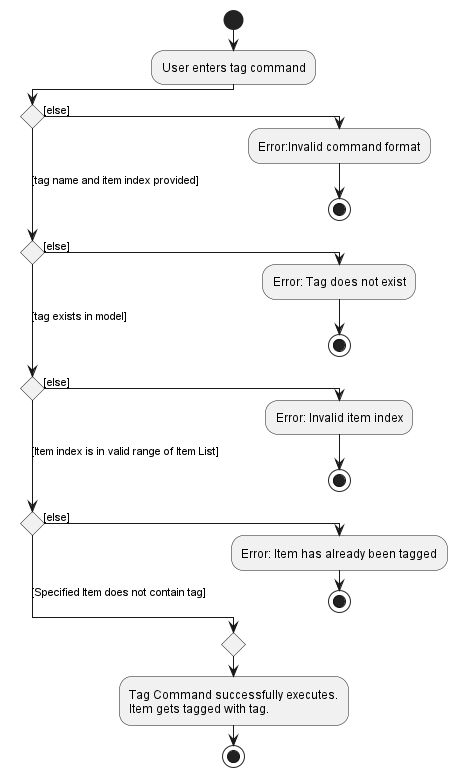
Feature Details
Here is the activity diagram showing the process of the tag command:
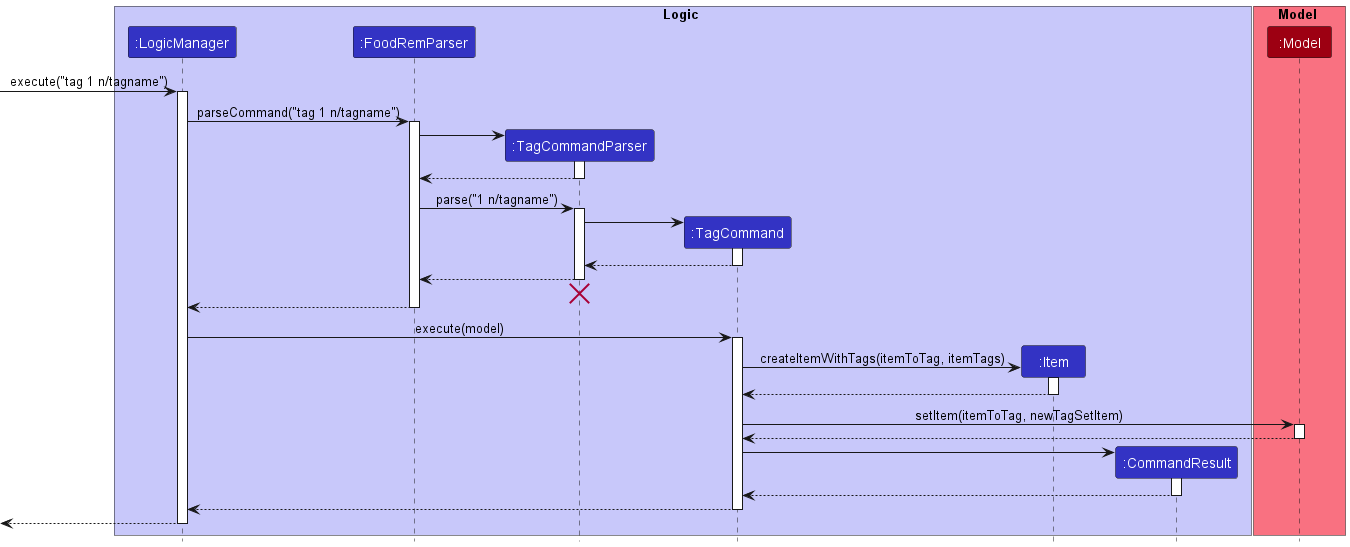
Here is the sequence diagram showing the interactions between the different components during a tag command.
- The user specifies a tag name and the item index (which corresponds to the index of the item displayed on the Item List in FoodRem UI).
- If the tag name or index is not provided, the user will be prompted to enter the command correctly via an error message.
- The tag name is cross-referenced with the current tags in the database and an error is thrown if the tag does not exist in the database.
- The index is cross-referenced to the list of item displayed and an error would be thrown if the index is out of range of the list. This informs the user that the item does not exist.
- If the item index and tag name are both valid, the item is checked to determine whether that item contains the specified tag. If the specified tag is already contained in the item, an error would be thrown to inform user about the duplicate tag.
- If Step 5 completes without any exceptions, a new copy of the item is created and the tag would be added to that item. This new copy of item would replace the original item in the database.
Feature Considerations
When the TagCommand is executed to tag a tag to an item, a copy of the item is created and the tag is added to it before replacing this new copy of the item with the original item in the list of items in FoodRem. We chose to replace the original item with the new item because this will allow the UI to detect a change in the UniqueItemList and thus update and show the item with their new tag included.
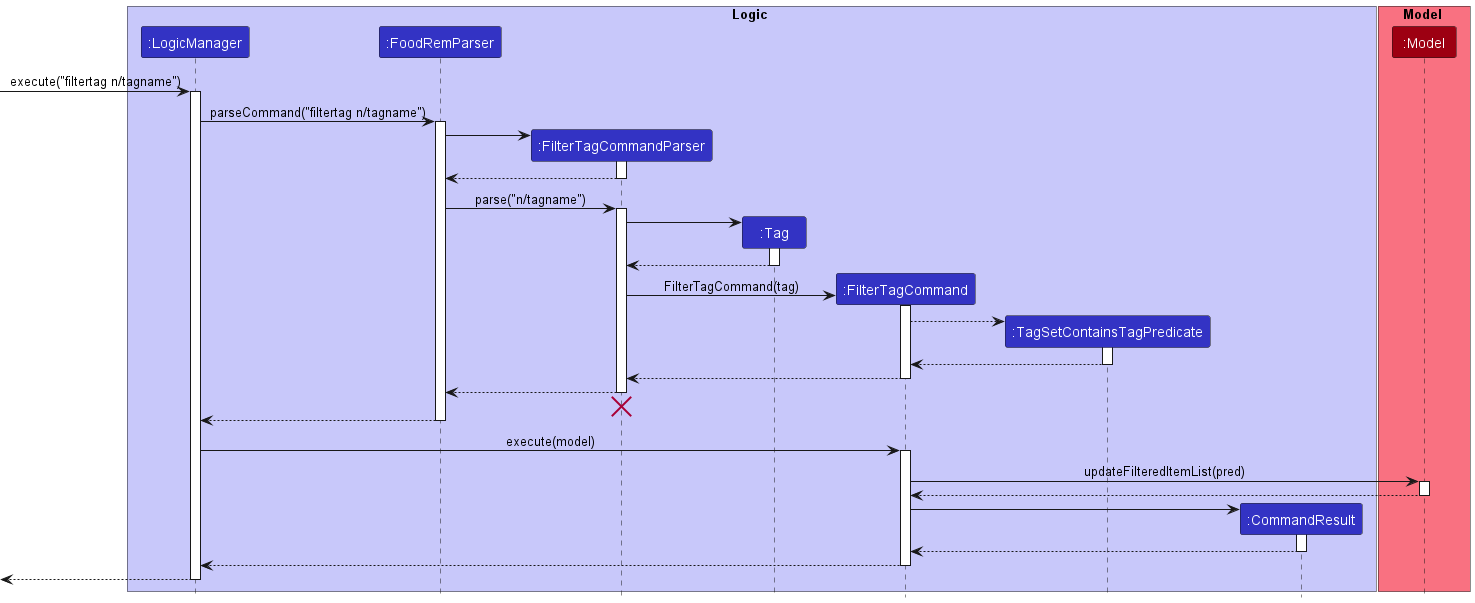
Filtering Items by Tag Name
Overview
The filtertag command filters the Item List for items tagged with the specified tag.
Feature Details
Here is the activity diagram showing the process of the tag command:
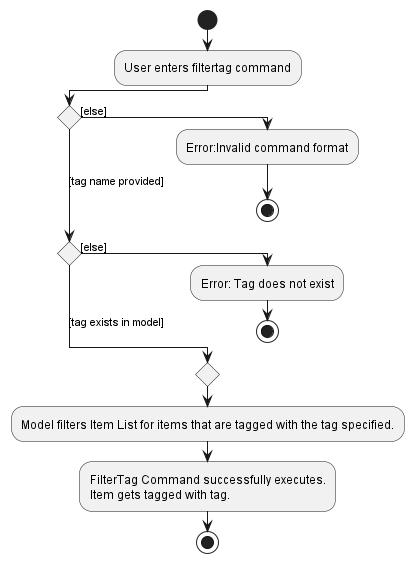
Here is the sequence diagram showing the interactions between the different components during a tag command.
- The user specifies a tag name of the tag to filter for.
- If the tag name is not provided, the user will be prompted to enter the command correctly via an error message.
- The tag name is cross-referenced with the current tags in the database and an error is thrown if the tag does not exist in the database.
- If the tag name is valid, the model filters the Item List for items that are tagged with this specified tag.
- If step 1 - 4 successfully complete, the displayed Item List in the GUI will be updated to only display items tagged with the specified tag.
Statistics Features
General Implementation Details
The statistics command is implemented as a standalone command that ties together the Item and Tag class. By performing calculations, it returns relevant statistics to the user.
General Design Considerations
The stats command calculates and provides users a list of statistics relating to FoodRem’s inventory. The list of statistics provided is as follows:
- Top three most expensive items
- Total amount of expired food
- Top three most common tags
Displaying Statistics
Overview
The stats command displays the calculated statistics based on the inventory by FoodRem.
Feature Details
- The user calls the
statscommand. - FoodRem performs the necessary calculations to obtain the statistics. FoodRem then displays the result to the user.
- If there are fewer than three items, or if there are fewer than three tags, FoodRem displays a placeholder “-“.
Feature Considerations
The three statistics were chosen as a baseline because they are a good starting point for users to help track their food waste. For example, the user can obtain the total amount of wasted food, which is food whose expiry date has already been passed. Future extensions can include additional statistics, or even provide further arguments to selectively display desired statistics. For example, stats topThreeMostExpensive would display the statistics for the top three most expensive items only.
General Features
General Implementation Details
The Exit command and Reset command do not contain complex implementations.
Exit command returns a CommandResult that returns true when calling the method shouldExit() on it.
The reset command functions like most other commands.
The HelpCommand is worth looking into, as it involves opening a separate window (HelpWindow).
Displaying Help Dialogs
The help feature provides the user with instructions of how to use a specified command.
Feature Details
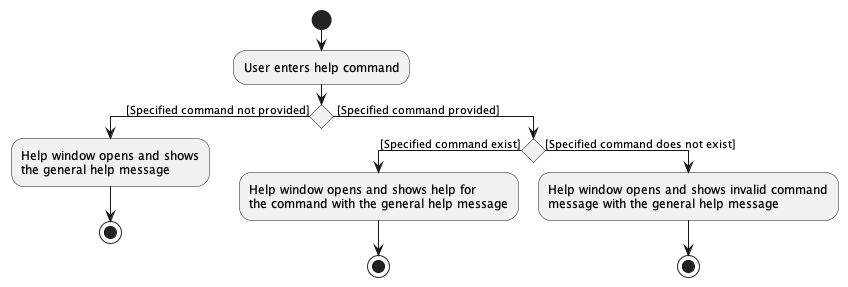
- The user specifies a command that they need help with. This is done using the word needed to execute a particular command in FoodRem.
- If this is not provided, a general help message will be shown.
- The provided command is cross-referenced with all available commands in FoodRem. If the command that the user needs help with does not exist, an error would be thrown. This informs the user that the command does not exist. A general help is also shown to the user.
- The help is shown in a new window that will open upon successful execution of the command.
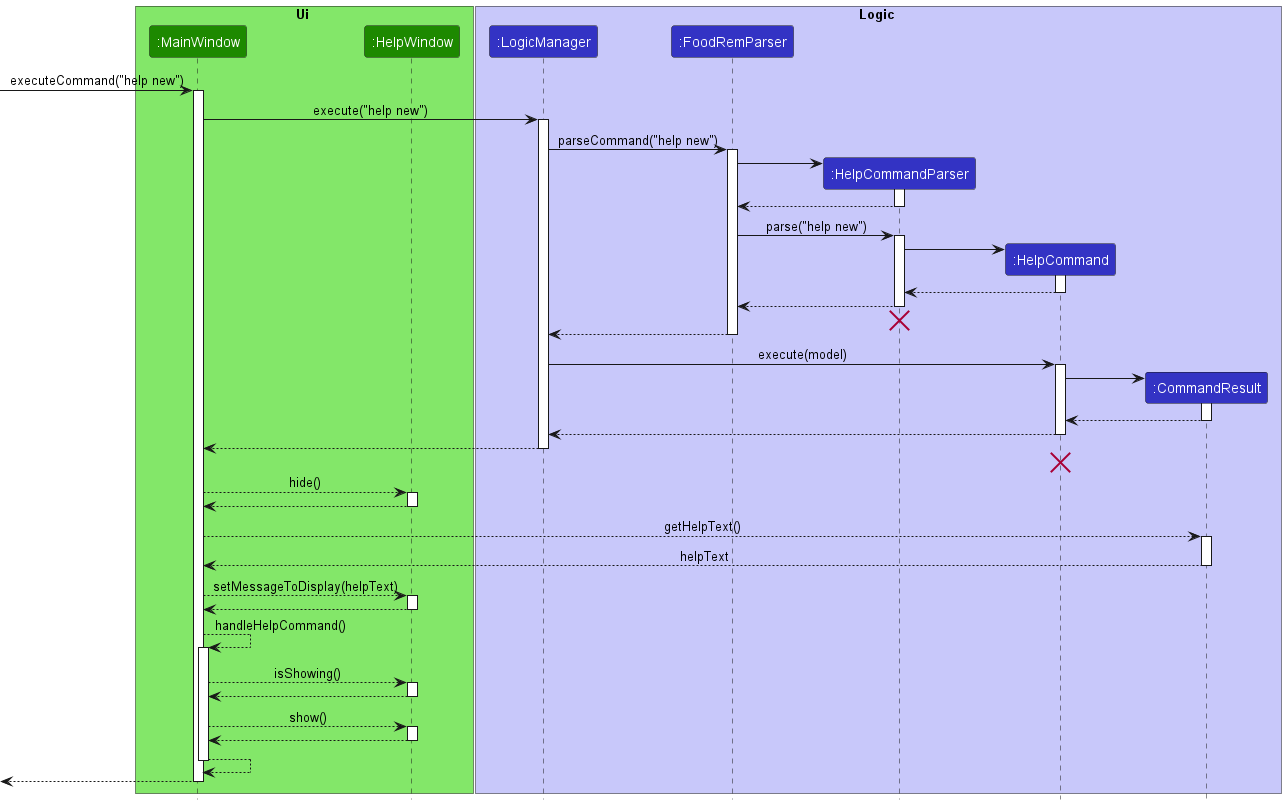
NOTE
The lifeline for HelpCommandParser and HelpCommand should end at the destroy marker (X) but due to a limitation of PlantUML, the lifeline reaches the end of the diagram.
In the above diagram, only methods relevant to showing the HelpWindow was shown. Other methods such as setFeedbackToUser and isShowHelp is not shown.
Feature Considerations
When the HelpCommand is executed we want users to receive help immediately instead of searching for it the User Guide.
User Interface
General Implementation Details
FoodRem’s User Interface or UI (more specifically, it is a
GUI
A Graphical User Interface is a graphics-based interface that uses icons, menus and a mouse (to click on the icon or pull down the menus) to manage interaction with the system. In FoodRem, this presents as the window that appears when launching it.
Click to view glossary
) consists of a main window and the Help Window. In this section, we will focus on the main window only, specifically, the Command Output Box component of the main window and its use of the “views”, “models” and “view models”.
General Design Considerations
The main window comprises of three components: the
Command Input Box
The region located at the top-left of FoodRem’s main window.
Click to view glossary
and
Item List Box
The region located at the bottom-left of FoodRem’s main window.
Click to view glossary
on the left half of the main window, as well as the
Command Output Box
The region located at the right half of FoodRem’s main window.
Click to view glossary
on the right half. For the Command Input Box, it only needs to render the same component each time in order to provide a text field for the user to type their commands into. Likewise, for the Item List Box, it only needs to render a list each time. While the number of items in the list may be variable, it is still the same component to render the list (specifically, it is JavaFX’s ListView component). This means that when a command is executed, any UI updates to these first two components can be achieved relatively easily.
However, the Command Output Box needs to be able to have potentially different rendered views to be shown to the user, depending on what command was run. This is where the “views”, “models” and “view models” come in. They are clarified as follows:
- “Views” return a JavaFX
Nodeobject in order to place into the Command Output Box - “Models” represent data entities used in FoodRem. See the Model Component section above for more information. The “models” that are concerned in the process of rendering outputs to the GUI are
items
Represents a thing that is stored and kept track by FoodRem.
Click to view glossary and tags The main method of categorizing items in FoodRem. A tag may be attached to zero or more items.
Click to view glossary . - “View models” are not always present, and act as a bridge for when the data contained in a single “model” is not enough for the corresponding “view” to be generated. As a “view” can only be generated from a single “view model”, when data from one or more “models” need to be processed and/or augmented before a “view” can be generated, the “view model” acts as a bridge to facilitate the process.
Rendering Command Output
UiView is the main class responsible for rendering the view to the Command Output Box. This is achieved when a caller calls UiView’s viewFrom method. The method then calls the from method of one of nine “views”, depending on the type of the object that was requested to be rendered.
The nine “views” are as follows:
| Class Name | Description |
|---|---|
FilterByTagView |
A view resulting from the filtertag command. |
ItemView |
A view resulting from the view command, as well as a generic view for items which may be used elsewhere. |
ItemWithMessageView |
A generic view of an item with a single message above it. This view results from the dec, del, edit, inc, new, rmk, tag and untag commands. |
StatsView |
A view resulting from the stats command. |
StringView |
A generic view for a string message. This view is used to display command errors, as well as the outputs of the exit, help, reset, find, list, and sort commands. |
TagToRenameView |
A view resulting from the renametag command. |
TagView |
A generic view for a
Tag
The main method of categorizing items in FoodRem. A tag may be attached to zero or more items.
Click to view glossary . Used in other views to ensure consistency of how a Tag looks like. |
TagsView |
A generic view for multiple
tags
The main method of categorizing items in FoodRem. A tag may be attached to zero or more items.
Click to view glossary , for use in other views. |
TagsWithMessageView |
A view of some tag(s) with a message above them. This view results from the deletetag, listtag and newtag commands. |
The individual “view” is responsible to generate the JavaFX Node structure to be placed into the Command Output Box. This node structure is then placed by UiView.
A sequence diagram of this process is as follows:
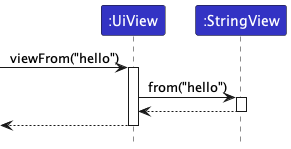
NOTE
The above sequence diagram assumes the caller requested a String to be rendered.
Future Extensions
Currently, UiView uses a very hacky method to determine the type of the object that was requested to be rendered; it uses consecutive instanceof expressions. Ideally, there should be a common interface where the necessary operations required can be achieved through dynamic binding. A possible class diagram is as follows:

Documentation, Configuration, and Other Guides
Here are some links to other documentation you might find useful:
Requirements
This section shares useful information regarding the non-technical aspects of development. This includes:
Product Scope
Target user profile:
Purchasing managers
A purchasing manager, also known as a purchasing director or supply manager, heads a team responsible for procuring goods and services for resale or company use.
Click to view glossary
who are proficient with typing for small F&B businesses
Value proposition: FoodRem empowers small food and beverage (F&B) restaurants to manage inventory and obtain insights from inventory data.
User Stories
INFO
The following legend describes the symbols used in this section:
| Priority | Symbol | Meaning |
|---|---|---|
| High | * * * |
Must have |
| Medium | * * |
Nice to have |
| Low | * |
Unlikely to have |
| Priority | As a… | I can… | So that… |
|---|---|---|---|
* * * |
purchasing manager | add a new item to my inventory | I can keep track of the data related to the new item |
* * * |
purchasing manager | delete an item from my inventory | remove an inventory item that I no longer need to track |
* * * |
purchasing manager | rename my inventory items | I can update items with an incorrect name |
* * * |
purchasing manager | edit the inventory quantity of my items | I can adjust for their purchase or usage |
* * * |
purchasing manager | edit the date I bought an item | I know when I have bought certain items and how long I have kept them |
* * * |
purchasing manager | edit the date my inventory will expire | I know when certain items need to be used |
* * * |
purchasing manager | increase the inventory quantity of my items | I can quickly increase its stock when I obtain the item(s) |
* * * |
purchasing manager | decrease the inventory quantity of my items | I can quickly decrease its stock when I use up the item(s) |
* * * |
purchasing manager | view all items in my inventory | I can have an overview of all items and their details |
* * * |
purchasing manager | search for items by name | I can view a specific item and its associated details |
* * * |
purchasing manager | search for items by tags | I can view all items that have the same tag |
* * * |
purchasing manager | sort items by name | I can see items arranged by their names in alphabetical order |
* * * |
purchasing manager | sort items by quantity | I can quickly see the items that are running low in quantity |
* * * |
purchasing manager | sort items by bought date | I can see the items bought from earliest to latest |
* * * |
purchasing manager | sort items by expiry date | I can see items arranged by how long until they expire |
* * * |
purchasing manager | sort items by price | I can see the items arranged from cheapest to most expensive |
* * |
purchasing manager | sort items by remarks | I can see the items arranged by their remarks in alphabetical order |
* * * |
purchasing manager | view a list of tags | so that I know what tags are available to use to tag items |
* * * |
purchasing manager | create tag | I can use them to classify inventory items |
* * * |
purchasing manager | rename a tag | I can update a tag with an incorrect name |
* * * |
purchasing manager | delete a tag | I can remove tags that will not be used anymore |
* * * |
purchasing manager | add a tag to an item | I can classify an item via this certain tag |
* * * |
purchasing manager | remove a tag from an item | I can choose not to classify an item via this certain tag |
* * * |
purchasing manager | view statistics of my inventory | I can have an overview of important data related to my inventory that can help me in my decision making in managing my inventory |
Use Cases
Use Case 1: Add Item to Inventory
Preconditions:
Item
Represents a thing that is stored and kept track by FoodRem.
Click to view glossary
to add does not yet exist in inventory.
MSS
The Main Success Scenario (MSS) describes the most straightforward interaction for a given use case, assuming that nothing goes wrong.
Click to view glossary
:
- User adds a new Item to the inventory.
- FoodRem informs user that item has been successfully created.
Use case ends.
Extensions:
-
1a. If the item name already exists in the inventory, FoodRem will throw an error.
- 1a1. FoodRem requests for the command to be entered again.
- 1a2. User re-enters the command.
- Steps 1a1-1a2 are repeated until the command entered is correct.
Use case resumes from step 2.
-
1b. FoodRem detects that there is an issue with the command entered.
- 1b1. FoodRem requests for the command to be entered again.
- 1b2. User re-enters the command.
- Steps 1a1-1a2 are repeated until the command entered is correct.
Use case resumes from step 2.
Use Case 2: Update Item in Inventory
Preconditions:
Item
Represents a thing that is stored and kept track by FoodRem.
Click to view glossary
to edit exists in inventory.
MSS
The Main Success Scenario (MSS) describes the most straightforward interaction for a given use case, assuming that nothing goes wrong.
Click to view glossary
:
- User chooses to view all items.
- FoodRem shows all items.
- User enters the command to edit the item with new fields.
- FoodRem informs user that item has been successfully edited.
Use case ends.
Extensions:
-
3a. If the item name does not exist in the inventory, FoodRem will throw an error.
- 3a1. FoodRem requests for the command to be entered again.
- 3a2. User re-enters the command.
- Steps 3a1-3a2 are repeated until the command entered is correct.
Use case resumes from step 3.
-
3b. FoodRem detects that there is an issue with the command entered.
- 3b1. FoodRem requests for the command to be entered again.
- 3b2. User re-enters the command.
- Steps 3b1-3b2 are repeated until the command entered is correct.
Use case resumes from step 3.
Use Case 3: Delete Item from Inventory
Preconditions:
Item
Represents a thing that is stored and kept track by FoodRem.
Click to view glossary
to delete exists in inventory.
MSS
The Main Success Scenario (MSS) describes the most straightforward interaction for a given use case, assuming that nothing goes wrong.
Click to view glossary
:
- User chooses to view all items.
- FoodRem shows all items.
- User enters the command to delete an item.
- FoodRem informs user that item has been successfully deleted.
Use case ends.
Extensions:
- 3b. FoodRem detects that there is an issue with the command entered.
- 3b1. FoodRem requests for the command to be entered again.
- 3b2. User re-enters the command.
- Steps 3b1-3b2 are repeated until the command entered is correct.
Use case resumes from step 3.
Use Case 4: Create Tag
Preconditions:
Tag
The main method of categorizing items in FoodRem. A tag may be attached to zero or more items.
Click to view glossary
does not yet exist in FoodRem.
MSS
The Main Success Scenario (MSS) describes the most straightforward interaction for a given use case, assuming that nothing goes wrong.
Click to view glossary
:
- User adds a new Tag to the inventory.
- FoodRem informs user that tag has been successfully created.
Use case ends.
Extensions:
-
3a. If the tag name already exists in the inventory, FoodRem will throw an error.
- 3a1. FoodRem requests for the command to be entered again.
- 3a2. User re-enters the command.
- Steps 3a1-3a2 are repeated until the command entered is correct.
Use case resumes from step 2.
-
3b. FoodRem detects that there is an issue with the command entered.
- 3b1. FoodRem requests for the command to be entered again.
- 3b2. User re-enters the command.
- Steps 3a1-3a2 are repeated until the command entered is correct.
Use case resumes from step 2.
Use Case 5: Find Item
MSS
The Main Success Scenario (MSS) describes the most straightforward interaction for a given use case, assuming that nothing goes wrong.
Click to view glossary
:
- User chooses to view items.
- FoodRem shows a list containing the items.
- User searches for an Item with one or more criteria.
-
FoodRem displays all items in inventory which matches the given criteria.
Use case ends.
- 3a. FoodRem detects that there is an issue with the command entered.
- 3a1. FoodRem requests for the command to be entered again.
- 3a2. User re-enters the command.
- Steps 3a1-3a2 are repeated until the command entered is correct.
Use case resumes from step 4.
Use Case 6: Add Tag to Item
Preconditions:
Tag
The main method of categorizing items in FoodRem. A tag may be attached to zero or more items.
Click to view glossary
has been created in FoodRem.
MSS
The Main Success Scenario (MSS) describes the most straightforward interaction for a given use case, assuming that nothing goes wrong.
Click to view glossary
:
- User chooses to view items.
- FoodRem shows a list containing the items.
- User enters command to add a specified tag to a desired item.
-
FoodRem informs user that the tag has been tagged to the item updated successfully.
Use case ends.
Extensions:
- 3a. FoodRem detects that there is an issue with the command entered.
- 3a1. FoodRem requests for the command to be entered again.
- 3a2. User re-enters the command.
- Steps 3a1-3a2 are repeated until the command entered is correct.
Use case resumes from step 4.
Use Case 7: Rename a tag
Preconditions:
Tag
The main method of categorizing items in FoodRem. A tag may be attached to zero or more items.
Click to view glossary
has been created in FoodRem.
MSS
The Main Success Scenario (MSS) describes the most straightforward interaction for a given use case, assuming that nothing goes wrong.
Click to view glossary
:
- User chooses to view all tags.
- FoodRem shows all tags.
- User enters the command to rename desired tag with a new tag name.
- FoodRem informs user that the tag has been updated successfully.
Use case ends.
Extensions:
- 3a. FoodRem detects that the new tag name already exist.
- 3a1. FoodRem requests for user to rename tag with a new tag name.
- 3a2. User re-enters the command to rename the desired tag.
- Steps 3a1-3a2 are repeated until the command entered is correct.
Use case resumes from step 4.
Use Case 8: Removing a tag from an item
Preconditions: The
tag
The main method of categorizing items in FoodRem. A tag may be attached to zero or more items.
Click to view glossary
to be removed is tagged to the item currently.
MSS
The Main Success Scenario (MSS) describes the most straightforward interaction for a given use case, assuming that nothing goes wrong.
Click to view glossary
:
- User chooses to view items.
- FoodRem shows a list containing the items.
- User enters command to remove the tag from the desired item.
- FoodRem informs user that the tag has been removed from the item successfully.
Use case ends.
Extensions:
- 3a. FoodRem detects that there is an issue with the command entered.
- 3a1. FoodRem requests for the command to be entered again.
- 3a2. User re-enters the command.
- Steps 3a1-3a2 are repeated until the command entered is correct.
Use case resumes from step 4.
Use Case 9: Increment/Decrement Quantity of Item
MSS
The Main Success Scenario (MSS) describes the most straightforward interaction for a given use case, assuming that nothing goes wrong.
Click to view glossary
:
- User chooses to view
items
Represents a thing that is stored and kept track by FoodRem.
Click to view glossary . - FoodRem shows a list containing the items.
- User increases/decreases the quantity of a specified item in the inventory.
- FoodRem informs user that item quantity has been incremented/decremented successfully.
Use case ends.
Extensions:
- 3a. Item quantity cannot be incremented/decremented further
- 3a1. FoodRem displays an error.
- 3a2. FoodRem asks the user if they want to try again
Use Case 10: Sorting List of Items by Criteria
MSS
The Main Success Scenario (MSS) describes the most straightforward interaction for a given use case, assuming that nothing goes wrong.
Click to view glossary
:
- User chooses to view
items
Represents a thing that is stored and kept track by FoodRem.
Click to view glossary . - FoodRem shows a list containing the items.
- User selects a criteria to sort the list by.
- The list items are reordered according to the chosen criterion.
Use case ends.
Non-Functional Requirements
- The product should work on any mainstream
OS
Operating System (OS) of the computer which manages the software and hardware on the computer.
Click to view glossary (Windows, macOS, Linux) that has Java 17 or above installed. - The product should be able to hold up to 1000 items without noticeable sluggishness in performance for typical usage.
- A user with above average typing speed for regular, English text (not code nor system admin commands) should be able to accomplish most of the tasks faster using commands than using the mouse.
- A user should not experience excessive sluggishness when searching and sorting items.
- The product should be for a single user (i.e. not a multi-user product where different users can run the application at different times on a shared computer).
- The data of the application is stored locally.
- A user must be able to view at least 5 items with minimal scrolling.
- A user should be able to use the app after reading the help instructions.
Instructions for Manual Testing
This section provides you with instructions to test the app manually. It also covers how to launch and shut down the application.
NOTE
These instructions only provide a starting point for testers to work on; testers are expected to do more exploratory testing.
Launch
Initial launch
- Download the jar file and copy it into an empty folder
- Double-click the jar file.
- Expected output: Shows the GUI with a set of sample items.
Items
Create a new Item
new n/Potato qty/2 u/kg bgt/10-10-2022
Expected Output in the
Item List Box
The region located at the bottom-left of FoodRem’s main window.
Click to view glossary
:
New item added into the list.
Expected Output in the
Command Output Box
The region located at the right half of FoodRem’s main window.
Click to view glossary
:
New item added message is displayed with the item details.
new qty/2
Expected Output in the
Command Output Box
The region located at the right half of FoodRem’s main window.
Click to view glossary
:
Error message for invalid command format.
List all items
Prerequisite: There is at least 1 item stored in FoodRem.
list
Expected Output in the
Item List Box
The region located at the bottom-left of FoodRem’s main window.
Click to view glossary
:
All items stored in FoodRem is displayed.
Expected Output in the
Command Output Box
The region located at the right half of FoodRem’s main window.
Click to view glossary
:
Listed all items message.
Search for an Item
Prerequisite:
There is only one item named Potato stored in FoodRem.
find Potato
Expected Output in the
Item List Box
The region located at the bottom-left of FoodRem’s main window.
Click to view glossary
:
Potato item is displayed.
Expected Output in the
Command Output Box
The region located at the right half of FoodRem’s main window.
Click to view glossary
:
1 item listed message.
find strawberry
Expected Output in the
Item List Box
The region located at the bottom-left of FoodRem’s main window.
Click to view glossary
:
No items display
Expected Output in the
Command Output Box
The region located at the right half of FoodRem’s main window.
Click to view glossary
:
0 items listed message.
Sort all items by an attribute
Prerequisite:
There are a few items stored in FoodRem and shown in the
Item List Box
The region located at the bottom-left of FoodRem’s main window.
Click to view glossary
with different names.
sort n/
Expected Output in the
Item List Box
The region located at the bottom-left of FoodRem’s main window.
Click to view glossary
:
Items are sorted in ascending alphabetical order based on name.
Expected Output
Command Output Box
The region located at the right half of FoodRem’s main window.
Click to view glossary
:
Items sorted message.
View the information of an Item
Prerequisite:
There is at least 1 item shown in the
Item List Box
The region located at the bottom-left of FoodRem’s main window.
Click to view glossary
.
view 1
Expected Output in the
Item List Box
The region located at the bottom-left of FoodRem’s main window.
Click to view glossary
:
Still showing the same list as before.
Expected Output
Command Output Box
The region located at the right half of FoodRem’s main window.
Click to view glossary
:
Details of first item in Item List Box shown.
Displayed information includes the name, quantity, unit, bought date, expiry date, price, remarks and tags of items.
Increment the quantity of an item
Prerequisite: The first item in the Item List Box has a quantity of 1.
inc 1 qty/20
Expected Output in the
Item List Box
The region located at the bottom-left of FoodRem’s main window.
Click to view glossary
:
Still showing the same list as before but with first item quantity increased by 20.
Expected Output
Command Output Box
The region located at the right half of FoodRem’s main window.
Click to view glossary
:
Incremented item quantity message with details of first item in Item List shown.
inc 1
Expected Output in the
Item List Box
The region located at the bottom-left of FoodRem’s main window.
Click to view glossary
:
Still showing the same list as before but with first item quantity increased by 1.
Expected Output
Command Output Box
The region located at the right half of FoodRem’s main window.
Click to view glossary
:
Incremented item quantity message with details of first item in Item List shown.
Decrement the quantity of an item
Prerequisite: The first item in the Item List Box has a quantity of 3.
dec 1 qty/2
Expected Output in the
Item List Box
The region located at the bottom-left of FoodRem’s main window.
Click to view glossary
:
Still showing the same list as before but with first item quantity decreased by 2.
Expected Output
Command Output Box
The region located at the right half of FoodRem’s main window.
Click to view glossary
:
Decremented item quantity message with details of first item in Item List shown.
dec 1
Expected Output in the
Item List Box
The region located at the bottom-left of FoodRem’s main window.
Click to view glossary
:
Still showing the same list as before but with first item quantity decreased by 1.
Expected Output
Command Output Box
The region located at the right half of FoodRem’s main window.
Click to view glossary
:
Decremented item quantity message with details of first item in Item List shown.
Edit the information of an item
Prerequisite:
The first item in the
Item List Box
The region located at the bottom-left of FoodRem’s main window.
Click to view glossary
has a name of Potato.
edit 1 n/Tomato
Expected Output
Item List Box
The region located at the bottom-left of FoodRem’s main window.
Click to view glossary
:
The Potato item has been renamed to Tomato and this is now reflected in the
Item List Box
The region located at the bottom-left of FoodRem’s main window.
Click to view glossary
.
Expected Output
Command Output Box
The region located at the right half of FoodRem’s main window.
Click to view glossary
:
Item edited message with details of the edited item shown.
Add a remark to an item
Prerequisite:
The first item in the
Item List Box
The region located at the bottom-left of FoodRem’s main window.
Click to view glossary
has no remarks.
rmk 1 r/For Party
Expected Output in the
Item List Box
The region located at the bottom-left of FoodRem’s main window.
Click to view glossary
:
Same list as shown before.
Expected Output
Command Output Box
The region located at the right half of FoodRem’s main window.
Click to view glossary
:
Remark updated message with the details of the item that has remark updated shown.
Deleting an Item
Prerequisite:
There is at least 1 item in the
Item List Box
The region located at the bottom-left of FoodRem’s main window.
Click to view glossary
.
del 1
Expected Output in the
Item List Box
The region located at the bottom-left of FoodRem’s main window.
Click to view glossary
:
First item in the list is deleted.
Expected Output
Command Output Box
The region located at the right half of FoodRem’s main window.
Click to view glossary
:
Deleted item message and its details.
del 0
Expected Output
Command Output Box
The region located at the right half of FoodRem’s main window.
Click to view glossary
:
Error message for invalid command format.
Tags
Create a new tag
newtag n/Fruits
Expected Output
Command Output Box
The region located at the right half of FoodRem’s main window.
Click to view glossary
:
New tag added and its details.
newtag n/\
Expected Output
Command Output Box
The region located at the right half of FoodRem’s main window.
Click to view glossary
:
Error message for invalid name format.
List all tags
listtag
Expected Output
Command Output Box
The region located at the right half of FoodRem’s main window.
Click to view glossary
:
All current exisiting tags of FoodRem are listed.
Tag an Item
Prerequisite: Tag and Item to be tagged exists.
tag 1 n/Food
Expected Output in the
Item List Box
The region located at the bottom-left of FoodRem’s main window.
Click to view glossary
:
The specified item is tagged.
Expected Output
Command Output Box
The region located at the right half of FoodRem’s main window.
Click to view glossary
:
Message indicating item has been successfully tagged.
tag n/Food
Expected Output
Command Output Box
The region located at the right half of FoodRem’s main window.
Click to view glossary
:
Error message for invalid command format.
Untag an Item
Prerequisite: Tag and Item to be tagged exists. Tag is also currently tagged to the specified item.
untag 1 n/Food
Expected Output in the
Item List Box
The region located at the bottom-left of FoodRem’s main window.
Click to view glossary
:
The specified item is untagged from the tag.
Expected Output
Command Output Box
The region located at the right half of FoodRem’s main window.
Click to view glossary
:
Message indicating item has been successfully untagged.
untag n/Food
Expected Output
Command Output Box
The region located at the right half of FoodRem’s main window.
Click to view glossary
:
Error message for invalid command format.
Rename a Tag
Prerequisite:
A tag with a tag name Fruits exist and a tag with a tag name Food does not exist.
renametag n/Fruits n/Food
Expected Output in the
Item List Box
The region located at the bottom-left of FoodRem’s main window.
Click to view glossary
:
The Fruits tag is renamed to Food.
Expected Output
Command Output Box
The region located at the right half of FoodRem’s main window.
Click to view glossary
:
Details of original and renamed tags.
renametag n/Fruits n/Fruits
Expected Output
Command Output Box
The region located at the right half of FoodRem’s main window.
Click to view glossary
:
Error message for renaming to duplicate name.
Delete a Tag
Prerequisite:
A tag with a tag name Food currently exists in FoodRem.
deletetag n/Food
Expected Output in the
Item List Box
The region located at the bottom-left of FoodRem’s main window.
Click to view glossary
:
Food tags if shown, are deleted.
Expected Output
Command Output Box
The region located at the right half of FoodRem’s main window.
Click to view glossary
:
Tag deleted details.
Filter by a Tag
Prerequisite:
A tag with a tag name of fruits currently exists in FoodRem and is tagged to a few items.
filtertag n/fruits
Expected Output in the
Item List Box
The region located at the bottom-left of FoodRem’s main window.
Click to view glossary
:
Items with the fruits tag are shown.
Expected Output
Command Output Box
The region located at the right half of FoodRem’s main window.
Click to view glossary
:
Details of the tag and number of items filtered.
Statistics
Display statistics
stats
Expected Output in the
Item List Box
The region located at the bottom-left of FoodRem’s main window.
Click to view glossary
:
No changes in the displayed items.
Expected Output
Command Output Box
The region located at the right half of FoodRem’s main window.
Click to view glossary
:
Statistics which include total cost incurred due to food wastage, top 3 common tags and top 3 items with the highest value.
Help
help
Expected Output:
The
Help Window
A pop-up window containing help information, shown only after calling a help command.
Click to view glossary
pops up and shows a general help message.
help new
Expected Output:
The
Help Window
A pop-up window containing help information, shown only after calling a help command.
Click to view glossary
pops up and shows a general help message with the help information for the new command.
Reset
reset
Expected Output in the
Item List Box
The region located at the bottom-left of FoodRem’s main window.
Click to view glossary
:
All items in the
Item List Box
The region located at the bottom-left of FoodRem’s main window.
Click to view glossary
are cleared.
Expected Output in the
Command Output Box
The region located at the right half of FoodRem’s main window.
Click to view glossary
:
FoodRem reset success message.
Exit
exit
Expected Output: FoodRem application closes.
Effort
Implementing FoodRem was not a straightforward task. Given below is a summary of the effort our team has put into to develop FoodRem as well as some challenges faced.
Morphing of AB3 to FoodRem
As we wanted to morph AB3 to fit into our idea of FoodRem, we had to refactor a large portion of the initial codebase and implement several new classes to get the basic minimum viable product of FoodRem. This included creating the Item class and its associated inner field classes. For theTag class, we also created a separate class for it so that we are able to have more flexibility in creating more commands that can make use of the Tag class. This is so that we can implement tag commands that can bring even more value to our users than the initial AB3 implementation does not support (e.g. deleting a tag for all items, finding all items with a certain tag) We also had to update how the application will store items and tags separately. In addition, many previous commands of AB3 had to be refactored or changed, and we added several new commands to FoodRem as well. Eventually, we were able to successfully implement both the Item and Tag classes and all their associated commands.
One challenge we ran into during the project was implementing a batch feature for our items. We wanted to be able to create the same items in different batches (i.e. same name but different
bought date
Date where an item was purchased. Bought date is in the format “day-month-year”, represented in the “dd-mm-yyyy” format.
Click to view glossary
and
expiry date
Date where an item spoils, expires, or becomes unusable. Expiry date is in the format “day-month-year”, represented in the “dd-mm-yyyy” format.
Click to view glossary
). However, this would require another major refactoring of the classes we have, as well as the commands that we have implemented thus far in the project. Given the tight timeline of the team project, we eventually decided to drop this feature since we would not be able to deliver the full functionality (along with updating every other command we have implemented thus far) in time. If given more time, this would be a feature that we have implemented, as it is a relevant feature that will be used in the real world and brings value to our target users.
Revamping of UI
We wanted a simple yet appealing
graphical user interface
A Graphical User Interface is a graphics-based interface that uses icons, menus and a mouse (to click on the icon or pull down the menus) to manage interaction with the system. In FoodRem, this presents as the window that appears when launching it.
Click to view glossary
for our application’s users. As such, we decided to change the original UI of AB3 into our own new FoodRem UI. As our team was not familiar with JavaFX initially, it took us considerable time and effort to produce an eventual satisfactory and working UI that we were proud to adopt and incorporate into our application.
Glossary
A
Admonitions
Admonition boxes (or simply “admonitions”) are coloured boxes containing highlighted pieces of text.
For details on the various types of various types of admonitions used in FoodRem, see the section on Admonition Boxes.
Argument
A value that is passed into a command.
Example:
newtag food, where food is the argument to the command newtag
B
Bought Date
Date where an item was purchased. Bought date is in the format “day-month-year”, represented in the “dd-mm-yyyy” format.
C
Command
A feature or function that FoodRem can perform.
Command Input Box
The region located at the top-left of FoodRem’s main window.
To view more information, refer to the Layout section of the User Guide.
Command Output Box
The region located at the right half of FoodRem’s main window.
To view more information, refer to the Layout section of the User Guide.
E
Expiry Date
Date where an item spoils, expires, or becomes unusable. Expiry date is in the format “day-month-year”, represented in the “dd-mm-yyyy” format.
F
Flag
A marker or delimiter signifying a potentially optional argument to a command. For example on FoodRem, in the syntax n/ITEM_NAME , n/ is the flag.
G
Graphical User Interface
A Graphical User Interface is a graphics-based interface that uses icons, menus and a mouse (to click on the icon or pull down the menus) to manage interaction with the system. In FoodRem, this presents as the window that appears when launching it.
H
Help Window
A pop-up window containing help information, shown only after calling a help command.
To view more information, refer to the Layout section of the User Guide.
I
Input
The text that a user would enter into FoodRem.
Item
Represents a thing that is stored and kept track by FoodRem.
Example: Creating a potato item
new n/potato
Item List Box
The region located at the bottom-left of FoodRem’s main window.
To view more information, refer to the Layout section of the User Guide.
M
Main Success Scenario (MSS)
The Main Success Scenario (MSS) describes the most straightforward interaction for a given use case, assuming that nothing goes wrong.
O
Operating System (OS)
Operating System (OS) of the computer which manages the software and hardware on the computer.
Output
The result of calling a Command. Results are displayed in the GUI, here: (ADD SCREENSHOT)
P
Parameter
Parameters identify values passed into your Commands. For example, when calling add n/ItemName, the parameter here is n/ItemName.
Placeholder
Placeholders in FoodRem refers to the UPPER_CASE words that appear after flags in commands that can be replaced by user input supplied. For example in n/ITEM_NAME, ITEM_NAME is a placeholder.
Purchasing Manager
A purchasing manager, also known as a purchasing director or supply manager, heads a team responsible for procuring goods and services for resale or company use.
Q
Quantity
The amount/count of item(s) kept track by FoodRem.
S
Substring
A contiguous sequence of characters (letters) that form a part (or a whole) string of text.
Example: “ca” is a substring of “ca”, “cat” and “thecat”, but not “ac”.
T
Tag
The main method of categorizing items in FoodRem. A tag may be attached to zero or more items.
U
Use Case
A use case describes an interaction between the user and the system for a specific functionality of the system.
User Story
User stories are short, simple descriptions of a feature told from the perspective of the person who desires the new capability, usually a user or customer of the system. Typically in the format “As a {user type/role} I can {function} so that {benefit}”.